Hylafax Fax Server Installation & Configuration

It’s 2012 and many people still rely on faxes and faxing. I recently had need for a system that would allow faxes to be broadcast from users’ desktops. There are several solutions on the market, including web based internet faxing. But, I was shocked to see the pricing especially for the in-house fax servers. Fortunately, there is a free alternative called Hylafax that is very good.

Hylafax is a free and open source fax server that runs on Linux. From the fairly extensive documentation, setting up a Hylafax server may seem like a daunting task, but it is quite straightforward.

In this example, I’m using an Ubuntu Linux server, but most of the major Linux distributions include Hylafax in their repositories, so you can use any flavor of Linux that you choose. Naturally, you’ll need a modem so be sure to check the Hylafax site for supported models, although most fax modems are fully supported. Do make sure that it is a fax modem, regular data modems might not work.

After the modem is connected and working, installing Hylafax on Ubuntu is typically Ubuntu/Debian easy.

sudo apt-get install hylafax-server

Once the installation is complete, we must configure Hylafax to run when the server is started. To do this run the setup wizard:

faxsetup

The resulting default options are usually correct. Here are the prompts with the typical answers.

HylaFAX configuration parameters are:
 
[1] Init script starts faxq: yes
[2] Init script starts hfaxd yes
[3] Start paging protocol: no
Are these ok [yes]? Yes
You have a HylaFAX scheduler process running. faxq will be
restarted shortly, as soon as some other work has been completed.
Can I terminate this faxq process (7523) [yes]? yes
Should I restart the HylaFAX server processes [yes]? yes

When this is complete, it is then necessary to confgiure Hylafax to use the connected modem(s). This is done with the faxaddmodem command.
sudo faxaddmodem
The first item is critical, which modem to use. Make sure that you point it to your modem device.
Serial port that modem is connected to [ttyS0]? ttyUSB2
After that most default settings are correct. But, be sure to enter your fax number and TSI details.

Country code [1]?
Area code [415]? 999
Phone number of fax modem [+1.999.555.1212]? 999-888-0000
Local identification string (for TSI/CIG) ["NothingSetup"]? "My Company"
Long distance dialing prefix [1]?
International dialing prefix [011]?
Dial string rules file (relative to /var/spool/hylafax) [etc/dialrules]?
Tracing during normal server operation [1]?
Tracing during send and receive sessions [11]?
Protection mode for received facsimile [0600]?
Protection mode for session logs [0600]?
Protection mode for ttyUSB1 [0600]?
Rings to wait before answering [1]?
Modem speaker volume [off]?
Command line arguments to getty program ["-h %l dx_%s"]?
Pathname of TSI access control list file (relative to /var/spool/hylafax) [""]?
Pathname of Caller-ID access control list file (relative to /var/spool/hylafax) [""]?
Tag line font file (relative to /var/spool/hylafax) [etc/lutRS18.pcf]?
Tag line format string [“From %%l|%c|Page %%P of %%T"]?
Time before purging a stale UUCP lock file (secs) [30]?
Hold UUCP lockfile during inbound data calls [Yes]?
Hold UUCP lockfile during inbound voice calls [Yes]?
Percent good lines to accept during copy quality checking [95]?
Max consecutive bad lines to accept during copy quality checking [5]?
Max number of pages to accept in a received facsimile [25]?
Syslog facility name for ServerTracing messages [daemon]?
Set UID to 0 to manipulate CLOCAL [""]?
Use available priority job scheduling mechanism [""]?

These settings are stored and editable in the following file:
/var/spool/hylafax/etc/config.
Next up is adding users who can use Hylafax. To do this you use this command:
sudo faxadduser –p
However, I planned to allow all the network users to send faxes and didn’t wish to add them all to hylafax. Additionally, this server was already connected to Active Directory for user authentication so I did not need to create accounts on the Linux server. (See my previous post on how to connect Linux to Active Directory.) Instead I chose to open access to the Hylafax server for my entire private network. To do this, I edited this file as follows;
/var/spool/hylafax/etc/hosts.hfaxd

localhost:21::
10\.123\.45\.[0-9{1,3}

This convoluted bit of text allows any host on the network 10.123.45.0/24 access to Hylafax. It is written in this obscure way because the file is interpreted as a regular expression and simply typing out 10.123.45.* would produce a few additional unexpected and possibly undesired permitted networks.

At this point, users with a Hylafax client on their desktops (You can find a long list of available clients, free and commercial for all platforms, on the Hylafax site.) can use the freshly installed Hylafax server for desktop faxing.

I’ll cover additional details like dialing rules and inbound fax routing in future posts. In the mean time, happy faxing.

Ubuntu Server 10.04

I recently did an upgrade on an Ubuntu 8.04LTS server to the newer 10.04.1LTS (aka Lucid Lynx) server. The upgrade was fraught with issues from the very start. Below are ones I’ve seen so far.

1. Running the upgrade things seemed to progress normally and after a while of grinding the upgrade process would fail with complaints about openoffice.org-writer2latex.

Could not install the upgrades
Error during commit
'E:Couldn't configure pre-depend jre for openoffice.org-writer2latex, probably a dependency cycle.'
Restoring original system state "

The not entirely intuitive resolution to this problem was to first use the package manager to uninstall openoffice.org-writer2latex and its dependencies and rerun the upgrade. This worked for the most part and, after an error from the postgrey package, the upgrade process would complete.

2. The postgrey upgrade would not work. Sifting through the install output one finds the following errors:

db4.7_upgrade: Program version 4.7 doesn't match environment version 4.6
db4.7_upgrade: DB_ENV->open: DB_VERSION_MISMATCH: Database environment version mismatch

This error is due to the postgrey installation script explicitly calling the Berkeley db4.7_upgrade utility despite the postgrey.db file already being at version 4.8. The workaround, until the script I fixed, is to temporarily rename the files as below:

cd /usr/bin
mv db4.7_upgrade db4.7_upgrade.orig
ln -s db4.8_upgrade db4.7_upgrade
apt-get install postgrey
rm db4.7_upgrade
mv db4.7_upgrade.orig db4.7_upgrade

It is important to head the warning messages from the postgrey install as well. The older version of Ubuntu configured postgrey to listen on port 60000 and the corresponding postfix policy service configuration to send to port 60000. However, this new version of Ubuntu 10.04 sets postgrey to use port 10023 and it is up to the user to manually change the setting in the /etc/postfix/main.cf file from

check_policy_service inet:127.0.0.1:60000

to
check_policy_service inet:127.0.0.1:10023

3. After restarting the server, I then see the following errors in the mail.log file:

postfix/tlsmgr[31109]: warning: request to update table btree:/var/spool/postfix/smtpd_scache in non-postfix directory /var/spool/postfix

This one is due to a change in who the process runs as resulting in a permissions issue when accessing the /var/spool/postfix directory.

The fix for this is to change the permissions on the /var/spool/postfix directory:
chown postfix /var/spool/postfix

I’m not getting codgerly about Ubuntu 10.04 just because of these few problems. Yes, it took a fair bit of time and it was a pain to figure out what was wrong and get it fixed. But, all things considered, these weren’t really big deals for a new version. No, the reason that I get codgerly about this stuff is that this is the newly released update 10.04.1. It should already have the fixes to all these stupid issues in it. These stupid issues have had bug reports, workarounds and in some cases patches for quite a while. In at least one case, the bug report was from March 2010, five months prior to the 10.04.1 release.
10.04.1 is a maintenance update to the original Ubuntu 10.04LTS release. For it to be released with stupid five month old bugs still outstanding is just ludicrous for a server product and an LTS one to boot.

DVD Transcoding With HandBrake

In an earlier post, the Net Codger wanted to transcode a DVD for playback on a portable device. In this case the device in question was an iPod Touch. Having been unsuccessful at the task while using openSUSE 11.1, success was later found on another computer that was running Ubuntu 8.04. But, success was not immediate. Here’s what happened.

Initially, I tried using Mencoder for the transcoding. Mencoder is part of the Mplayer project and is one of the most versatile transcoding tools available for the Linux or any platform. Mencoder is the Swiss Army knife of video transcoding tools capable for transcoding almost any format into almost any other format. Like a Swiss Army knife it is also so chock full of features and tools that it is cumbersome and unwieldy to use. But, not only is Mencoder a really powerful tool it is also one of the few tools available for such a job, on Linux, that actually works. Which is why it was my first choice.

Like I said Mencoder is rather cumbersome to use. Typically, it requires a vast array of command line switches specifying frame rates and sizes, bit rates, sample rates, sound encoders and more to achieve the desired output. I’ve used Mencoder in the past for similar tasks including transcoding DVDs for playback on Sony’s PSP. e.g. This “simple” command for PSP transcoding.

mencoder dvd://1 -dvd-device /dev/sr0

-aspect 16:9

-alang en -oac lavc

-ovc lavc

-of lavf

-lavcopts aglobal=1:vglobal=1:vcodec=mpeg4:vbitrate=384:acodec=aac:abitrate=64

-af lavcresample=24000 -vf harddup,scale=368:208

-lavfopts format=psp:i_certify_that_my_video_stream_does_not_use_b_frames

-ofps 30000/1001 -o M4V10005.MP4

-info name=”I Robot”

Simple, huh? But, not being an expert at video encoding or Mencoder I searched for a script or command line recipe for the iPod Touch transcoding job at hand. I finally settled upon this script at the My Humble Corner blog. The script was straightforward enough for me to read and understand while also promising the specific results required for the iPod Touch’s very specific playback requirements. These playback requirements include a special bunch of bits, called an atom, that are set in the .mp4 video file to indicate that the file came from iTunes/Quicktime and nowhere else. This is part of Apple’s continued attempts to lock in and impose DRM(Digitally Restricted Media) upon its customers. ‘You will use only Apple products! So says Steve, so say we all. Amen.’

Unlike my earlier openSUSE failures, this installation of Ubuntu 8.04 had no trouble playing and decoding DVDs but, it didn’t have Mencoder or the MP4Box application that the script required. A couple of quick and easy sudo apt-get install mencoder commands had me running the script in no time at all. While, the DVD was being transcoded and while I waited for the nearly four hours for it to complete I started contemplating the whole process. It was all too complicated and took too much time and effort. I remembered, with envy, all the accounts I had heard of Apple Mac users quickly and easily using a graphical tool called Handbrake to do all this. But, when last I had checked, Handbrake was Mac OS X only.

I started surfing around for a Linux equivalent, or at least a GUI front-end to Mencoder. What I found were a few stagnant open source projects that didn’t really offer too much hope. True they were GUI but, they weren’t very attractive, to say the least. Most were just as complicated to use as Mencoder itself, requiring detailed knowledge of video encoding and Mencoder. Then, by accident, I stumbled on a page that seemed to imply that HandBrake was now supporting Linux. I jumped over to the HandBrake site and was amazed to find that HandBrake now supported Linux and Windows, as well as the Mac.

Installing HandBrake on Ubuntu was easy since, they had an Ubuntu binary but, the source is also there for compilation if you need it. HandBrake also did not have as many dependencies as the other Mencoder solutions. Which was a pleasant surprise.

Running HandBrake, one is immediately aware of the fact that it has a superior quality GUI compared to the other contenders. It is attractive and highly functional while also being straightforward and intuitive enough for a transcoding novice to use.

HandBrake

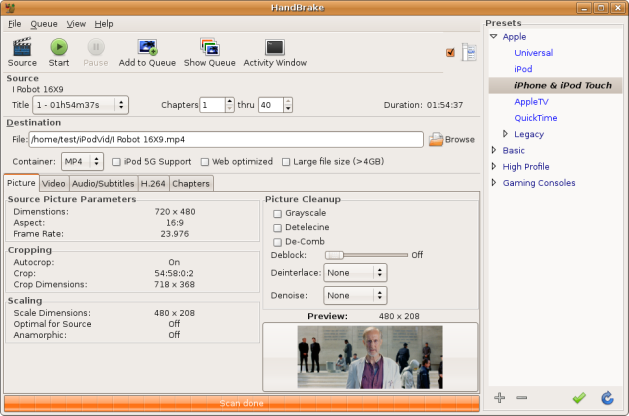
After choosing the source DVD, the user is presented with this screen that lists various formatting details as well as a very handy list of formatting presets for a variety of devices including the iPod Touch. This list of presets alone sets HandBrake way ahead of the competition. HandBrake also displays a sample frame from the DVD to show you what the output video will look like. Very nice!

HandBrake Video

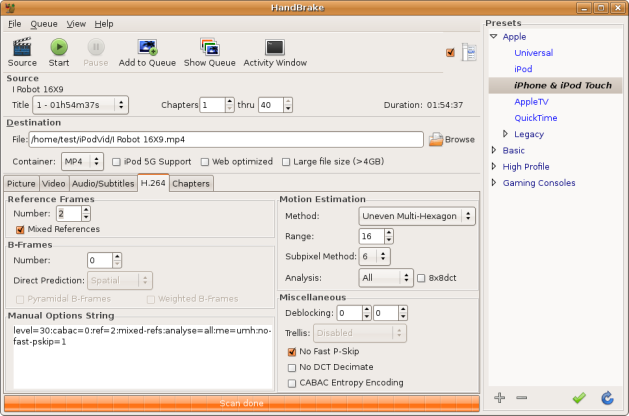
Choosing any of the tabs allows you to change various settings such as video, above, and H.264, below.

HandBrake H.264

But, HandBrake’s great features don’t end there. On top of everything else, HandBrake is also a fast transcoder. Where as the Mencoder script took nearly four hours to transcode the DVD, HandBrake transcoded the same DVD in under one hour!

It seems that the Mac users were right about HandBrake. HandBrake is, by far, the easiest to use, most attractive and fastest video transcoding solution I’ve used to date.

HandBrake is now Net Codger approved. Let’s hope that all the Linux distributions start including it in their repositories.