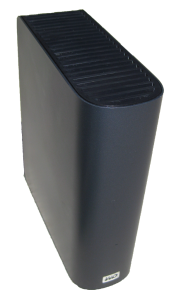
The Awesome Little Western Digital My Book Live

The Net Codger is mad as hell! For years Western Digital has been selling a tiny network attached hard drive called the My Book which I’ve duly ignored. “Cheap consumer stuff, bah!” Well, last week I purchased one, the Western Digital My Book Live 2 TB drive, and put it through its paces. Why didn’t anyone tell me that, for years, I had been ignoring a true gem? Why didn’t anyone tell me how fantastic this little drive is?

If, like me, you didn’t already know; the Western Digital My Book live is a network attached storage(NAS) device that uses the Linux OS as its core. Out of the box it offers backup options for Windows and Mac using the WD software or Time Machine respectively. It acts as a streaming media server. WD provides an app so that you can easily browse its media from an iPhone or iPad. WD includes a free service that allows you to access your files, stored on the My Book in your home, via the cloud(web) from anywhere. It is a really sweet little device for just a few dollars more than a bare drive of the same size.

But there’s more! The WD My Book Live uses a Power PC 800MHz processor with 256MB of RAM. It also has a gigabit ethernet network interface. The operating system is Debian and, get this, the Lenny and Squeeze repositories are enabled by default! So, I can atp-get install whatever-the-hell-I-want and it just works! Right out of the box! (After enabling SSH at http://mybook/ui/ssh)

For the price of a hard drive I have a fully functional, tiny, fanless, headless Linux PC. Why WD didn’t lock down the OS like most other manufacturers I’ll never know. But, kudos to them for keeping this beauty open! By doing so, they’re providing a fantastic opportunity for the hackers(tinkerers) out there. And a thriving community of My Book tinkerers has developed and is doing all sorts of neat projects with this inexpensive PC that lacks only video and USB ports.

To start off, I decided to test it unmodified in its factory default state. It comes with a CD that includes the installation and setup software, but I hate having to use a, usually Windows, PC to setup a network appliance. So, I went looking for a web interface instead. The WD My Book did not disappoint. Using only a browser, I was able to fully configure the device including a static IP address, SAMBA(Windows) network shares, users and passwords, even the online cloud(web) access feature. The interface was full featured, attractive, polished and intuitive.

Within minutes I had the My Book running on the network. Configuring Windows backups to backup to the My Book network shares was a snap, using Windows’ built-in backup application. Later testing with the WD Smartware monitoring and backup software, available on a share from the My Book and the CD, was also easy to use and worked great. Mac’s Time Machine backup application worked natively with the My Book and at only half the price of an Apple Time Capsule!

Next up was Linux and, as always, things got little a bit less easy. The reason being that, most Linux distributions don’t have slick and ready to use backup applications like Time Machine installed and ready to go. Don’t get me wrong, there are lots of backup tools and options from the old stalwart Tar to the now preferred method of Rsync. But, they are all fiddly command line tools that take a little effort to setup initially. I’ll post details of this process in another post, so it will be easy for you. But, once they’re configured, they work great without a second thought. On the My Book, Linux can backup to a SAMBA network share by default. But, after enabling SSH on the My Book other target options include FTP, SFTP, SSH, NFS, Rsync daemon and possibly more that I haven’t though of yet.

Now, let’s be clear, the WD My Book has no redundancy or data protection(available in the Duo version) so, you would be stupid to use it as your solitary storage device. Sooner or later the WD Green drive inside will fail.

But, using the My Book as a backup target where you are storing a redundant copy of your data is the safe option that it was designed for. It is a great backup strategy for multiple devices that can protect against hardware failure/loss/theft, as well as a grab and go option in the event of a natural disaster like, storm, fire or flood.

The My Book Live is not super fast. The 800MHz processor is small by today’s PC standards, but it’s the Green drive that limits performance, as I discussed in this previous post. Despite this, the performance is perfectly adequate for a home storage device.

But, the WD My Book does what it says on the box for a great price. And thanks to WD leaving open access to its Linux OS, it is a fantastic little device for a wide selection of other uses! You can get the Western Digital My Book Live 2 or 3TB drive for a great price from Amazon and I’d recommend one for every home network.
iPad 3 Day

iPad2 & iPad3The new iPad, more commonly referred to as the iPad 3, has just been delivered to the Codger’s door. The Net Codger now has an iPad 2 and an iPad 3 side by side on his desk. Here’s the low down.

The iPad 3 is a fraction thicker than the iPad 2. But, it’s barely noticeable at all. Even with them touching together on a flat surface as in the picture, one does not notice the difference in thickness. The iPad2 is on the left, but who could tell?

Reading the specification sheets on Apple’s website, I see that the iPad 3 is a fraction heavier than the iPad 2. I can’t feel the difference at all. For all intents and purposes, the iPad2 and iPad 3 are physically the same, if not identical, in appearance

iPad2 PixelsiPad3 Pixels

The screen does look different and its necessarily all good. Above the iPad 2 is on the left and the iPad 3 is on the right. True, everything does look “smoother”. The black lines between the pixels, visible on the iPad2, are invisible on the iPad3. It gives images a smoother appearance that is also a bit brighter and seemingly lower contrast than the screen right next to it. But, the image rendering on the higher resolution screen actually creates jaggies in some cases where none exist on the ipad 2. You’ll only see this with lower resolution stuff like wallpapers or apps with images scaled to the iPad 2 resolution. Looking at higher resolution images like those taken with the camera, the screen quality is great. Looking at text like icon labels you get the false impression that the iPad 2 is the sharper display because the lines between the pixels lend a sense of crispness where the IPad 3’s smoothing gives a sense of blurring to the text.

Repeatedly, when I present the two iPads to people side by side and ask which is a better picture, the majority choose the iPad 2!

There is no noticeable difference in performance, at least on the surface. The experience is a little different in a heavy app but bouncing from app to app and using Safari is identical on both of these WiFi connected iPads.

If you’ve got an iPad2 and are wondering if an upgrade is worth it, I would say that it depends. If you have need for 4G LTE, a higher resolution camera or the ability to dictate your texts and emails, then an iPad 3 might be worth the $500 or more to you. But, if you already have an iPad 2, spending another $500 plus dollars for an iPAd3 will be disappointing. Even if you watch a lot of movies on the iPad2 and think that the higher resolution screen is what you need, it would still be hard to justify the $500 or more to upgrade from an iPad 2.

If you have an iPad 1 or no iPad at all, you will LOVE the iPad 3. If you have an iPad 2, you’ll probably want to keep your money.

DVD Transcoding With HandBrake

In an earlier post, the Net Codger wanted to transcode a DVD for playback on a portable device. In this case the device in question was an iPod Touch. Having been unsuccessful at the task while using openSUSE 11.1, success was later found on another computer that was running Ubuntu 8.04. But, success was not immediate. Here’s what happened.

Initially, I tried using Mencoder for the transcoding. Mencoder is part of the Mplayer project and is one of the most versatile transcoding tools available for the Linux or any platform. Mencoder is the Swiss Army knife of video transcoding tools capable for transcoding almost any format into almost any other format. Like a Swiss Army knife it is also so chock full of features and tools that it is cumbersome and unwieldy to use. But, not only is Mencoder a really powerful tool it is also one of the few tools available for such a job, on Linux, that actually works. Which is why it was my first choice.

Like I said Mencoder is rather cumbersome to use. Typically, it requires a vast array of command line switches specifying frame rates and sizes, bit rates, sample rates, sound encoders and more to achieve the desired output. I’ve used Mencoder in the past for similar tasks including transcoding DVDs for playback on Sony’s PSP. e.g. This “simple” command for PSP transcoding.

mencoder dvd://1 -dvd-device /dev/sr0

-aspect 16:9

-alang en -oac lavc

-ovc lavc

-of lavf

-lavcopts aglobal=1:vglobal=1:vcodec=mpeg4:vbitrate=384:acodec=aac:abitrate=64

-af lavcresample=24000 -vf harddup,scale=368:208

-lavfopts format=psp:i_certify_that_my_video_stream_does_not_use_b_frames

-ofps 30000/1001 -o M4V10005.MP4

-info name=”I Robot”

Simple, huh? But, not being an expert at video encoding or Mencoder I searched for a script or command line recipe for the iPod Touch transcoding job at hand. I finally settled upon this script at the My Humble Corner blog. The script was straightforward enough for me to read and understand while also promising the specific results required for the iPod Touch’s very specific playback requirements. These playback requirements include a special bunch of bits, called an atom, that are set in the .mp4 video file to indicate that the file came from iTunes/Quicktime and nowhere else. This is part of Apple’s continued attempts to lock in and impose DRM(Digitally Restricted Media) upon its customers. ‘You will use only Apple products! So says Steve, so say we all. Amen.’

Unlike my earlier openSUSE failures, this installation of Ubuntu 8.04 had no trouble playing and decoding DVDs but, it didn’t have Mencoder or the MP4Box application that the script required. A couple of quick and easy sudo apt-get install mencoder commands had me running the script in no time at all. While, the DVD was being transcoded and while I waited for the nearly four hours for it to complete I started contemplating the whole process. It was all too complicated and took too much time and effort. I remembered, with envy, all the accounts I had heard of Apple Mac users quickly and easily using a graphical tool called Handbrake to do all this. But, when last I had checked, Handbrake was Mac OS X only.

I started surfing around for a Linux equivalent, or at least a GUI front-end to Mencoder. What I found were a few stagnant open source projects that didn’t really offer too much hope. True they were GUI but, they weren’t very attractive, to say the least. Most were just as complicated to use as Mencoder itself, requiring detailed knowledge of video encoding and Mencoder. Then, by accident, I stumbled on a page that seemed to imply that HandBrake was now supporting Linux. I jumped over to the HandBrake site and was amazed to find that HandBrake now supported Linux and Windows, as well as the Mac.

Installing HandBrake on Ubuntu was easy since, they had an Ubuntu binary but, the source is also there for compilation if you need it. HandBrake also did not have as many dependencies as the other Mencoder solutions. Which was a pleasant surprise.

Running HandBrake, one is immediately aware of the fact that it has a superior quality GUI compared to the other contenders. It is attractive and highly functional while also being straightforward and intuitive enough for a transcoding novice to use.

HandBrake

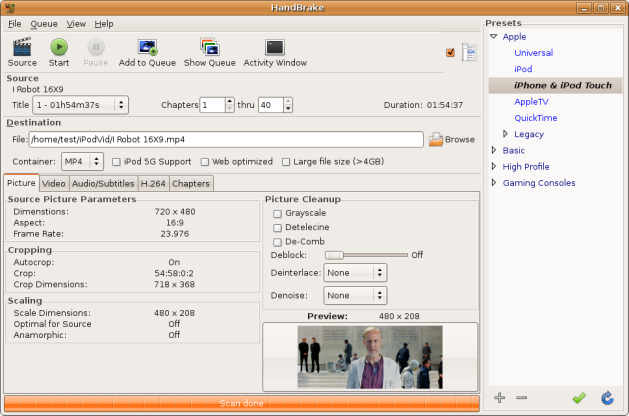
After choosing the source DVD, the user is presented with this screen that lists various formatting details as well as a very handy list of formatting presets for a variety of devices including the iPod Touch. This list of presets alone sets HandBrake way ahead of the competition. HandBrake also displays a sample frame from the DVD to show you what the output video will look like. Very nice!

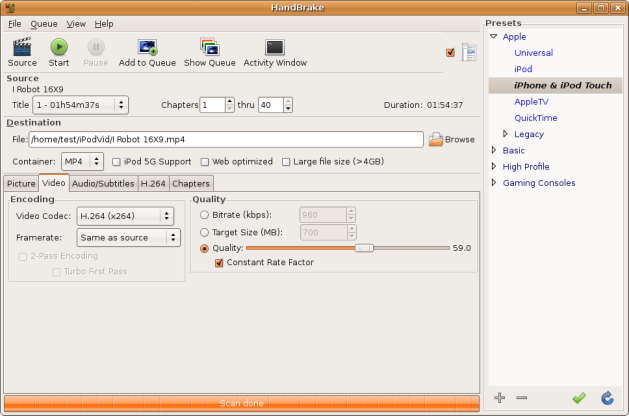
HandBrake Video

Choosing any of the tabs allows you to change various settings such as video, above, and H.264, below.

HandBrake H.264

But, HandBrake’s great features don’t end there. On top of everything else, HandBrake is also a fast transcoder. Where as the Mencoder script took nearly four hours to transcode the DVD, HandBrake transcoded the same DVD in under one hour!

It seems that the Mac users were right about HandBrake. HandBrake is, by far, the easiest to use, most attractive and fastest video transcoding solution I’ve used to date.

HandBrake is now Net Codger approved. Let’s hope that all the Linux distributions start including it in their repositories.