Brother MFC-9560CDW Linux Support

Linux support for the Brother MFC-9560CDW multifunction color laser printer is present for printing, faxing and scanning via the network, but it is not delivered with nearly the same quality software or ease of use that is provided for Windows and Mac users. This is a common circumstance for Linux users, but it still makes me Codgerly.

Sufficient digging around on the Brother website does locate the Linux drivers in both 32 bit and 64 bit architectures in Deb and RPM formats. Installation is command line based and is straight forward for anyone who has done command line based package manager installations on Linux before. Brother also has some decent installation instructions on their website along with the drivers.

In the Net Codger’s case, the installation was on openSUSE 11.4 32 bit.The printer drivers were installed first with:

sudo rpm -ivh mfc9560cdwlpr-1.1.1-5.i386.rpm
sudo rpm -ivh mfc9560cdwcupswrapper-1.1.1-5.i386.rpm

This is then followed up by verifying the presence or adding the printer in CUPS.

Next up is the scanner driver. It’s installed with the following commands.

sudo rpm -ivh brscan4-0.3.0-2.i386.rpm
brsaneconfig4 -a name=SCANNER model=MFC-9560CDW ip=yourprintersIP

At this point, your preferred scanning utility can access and scan from the printer/scanner over the network. Nice! But, what about initiating the scan from the scanner itself? To use the Scan button on the printer/scanner you need another utility to listen for and receive the scan. This final utility is installed and configured with these commands.

sudo rpm -ivh brscan-skey-0.2.1-3.i386.rpm
sudo brskey
brscan-skey

You can now choose your Linux username as a scan recipient directly from the front panel of the MFC-9560CDW and upon scanning the page, the scanned image appears on the Linux PC’s screen. In this case inside Gimp. Unfortunately, what the instructions don’t tell you is that the brscan-key utility must be run each time a user logs in, nor do they tell you how to accomplish this.While this omission is not a big deal for the more seasoned Linux user, it might elude the newcomer.

In the case of openSuSE 11.4 and others, I feel that the best way to get the brscan-key utility running on each login is to place a .desktop file in the /etc/xdg/autostart folder, as follows.

/etc/xdg/autostart/brscan-skey.desktop

[Desktop Entry]
X-SuSE-translate=true
Type=Application
Name=BrScan Scan Key Tool
Comment=PC target for scanner.
Icon=hwinfo
Exec=/usr/bin/brscan-skey
Terminal=false
Type=Application
Categories=
OnlyShowIn=GNOME;XFCE;KDE;

But wait! We’re still not really done. At this point scanning from the MFC-9560CDW to a file results in an “oddly formatted” .ppm image file with a random six character extension being deposited in the ~/brscan directory. While Gwenview does readily display this image, this is not a very portable format so sharing and emailing become an issue. What’s worse is that if you want to scan multiple pages with your shiny new automatic document feeder(ADF) you’ll have even less luck. To fix this we need to add some more software and a script to handle the scanner output.

First, you’ll want to grab the sane-frontends package so that you can use its scanadf utility. It’s also very handy to have the unpaper utility for straitening and image cleanup, so get that too. Next you’ll want to edit the provided Brother scan to file script to properly receive and convert the scanned image(s) into something useful like a PDF. I’ve adapted their example to suit my needs using the ImageMagick convert utility to output the desired PDF format on a KDE desktop.

/usr/local/Brother/sane/script/scantofile-0.2.1-3.sh

#! /bin/sh
set +o noclobber
#
# $1 = scanner device
# $2 = friendly name
#

#
# 100,200,300,400,600
#
resolution=200
letter=279
legal=356
device=$1
BASE=$HOME/brscan
mkdir -pv $BASE
cd $BASE

if [ "`which usleep`" != ' ' ];then
usleep 10000

else
sleep 0.01
fi

output_tmp=$(date +%m%d%y).tmp
output_final=Scan$(date +%k%M%m%d%y)

echo "scan from $2($device)"
# Change -y $letter to $legal if that size is being scanned.

#Duplex command below
#scanadf --device-name "$device" --source "Automatic Document Feeder(centrally aligned,Duplex)" --resolution $resolution -y $letter -o"$output_tmp"_%04d

#Simplex Command below
scanadf --device-name "$device" --resolution $resolution -y $letter -o"$output_tmp"_%04d

# Popup notification on error
#
if [ $? = 1 ];then
kdialog --title "Scanner error" --msgbox "$err1"
else

echo Straighten images.

for i in $(ls "$output_tmp"*); do
/usr/bin/unpaper "$i" 1"$i"
done
rm -f $(ls "$output_tmp"*)

echo convert "$output_tmp" "$output_final".pdf
#
convert -density $resolution -sharpen 0x1 -compress jpeg $(ls 1"$output_tmp"*) "$output_final".pdf
rm -f $(ls 1"$output_tmp"*)

# Open the PDF in your preferred viewer
okular "$output_final".pdf
fi
exit

As you can see in the script there is still a slight inconvenience that I have not figured out how to address automatically. That is, the selection between letter sized and legal sized scans requires altering the script manually prior to scanning. The same is also true for the selection of duplex scanning. But, despite this inconvenience, printing and scanning between the Brother MFC-9560CDW multifunction color laser printer and Linux works great!
Repairing Grub

Well, the Windows 7 beta installation clobbered my Grub boot loader. Now, instead of a Grub menu with five different OS installations, I have the newest Windows boot loader and only Windows 7 and Vista listed. Not surprisingly, I want my stuff back.

Grabbing an openSUSE 11.1 installation DVD I boot from it and then choose Rescue System from the DVD’s boot menu. I then login to the rescue system and run grub.

Inside the grub shell I type:

find /boot/grub/stage1

This is to locate which disk, partition my old grub files are located on. I am able to determine that hd0,5 is my desired boot partition and next execute:

root (hd0,5)

This sets the root partition variable to that location and I can now run grub’s setup program.

setup (hd0)

It quickly steps through a few checks and then installs grub to the MBR.

quit

I rebooted the laptop, remembering to remove the DVD, and I am please to see my old openSUSE 11.1 Grub boot menu restored and listing all of my Oses except Windows 7. Now, I could at this point enter Grub’s editor mode and manually set it up but, with all the partitions involved, I’d rather have a graphical view and some more powerful editing tools than the grub editor so, I choose the openSUSE 11.1 install from the list and boot it with the intent of adding Windows 7 to the grub list from within openSUSE.

After logging in to openSUSE, I catch myself at a terminal running

fdisk -l

to list partitions and

sudo vi /boot/grub/menu.lst

to edit the grub menu. I guess I didn’t really need graphical after all but, I had said I wanted a graphical view so I stop and close the terminal window.

Starting up Yast, I navigate to System -> Boot Loader. On the resulting screen I click Add and select to add a Chainloader Section and click Next. At the section editor screen, I assign it a name(Windows 7) click “Do not Verify Filesystem Before Booting” and then click the “Other System” drop down to select the desired partition. In this case /dev/sda7. After clicking OK I am returned to the previous menu screen and then use the Up and Down buttons to rearrange the menu options that Grub will provide at boot. A final OK and reboot presents me with a Grub menu replete with my newly installed Windows 7 option.

Choosing Windows 7 from the menu, the screen advises that it is booting (hd0,5) and freezes. Nuts! Poking around some more, I reboot and choose the Vista boot option from the Grub menu and it then presents me with the Windows Boot Loader screen containing Vista and Windows 7. Oh, I get it. It’s not as simple as I had thought. The Windows 7 boot files are still on the Vista partition so, I have to access the Vista partition first in order to boot Windows 7. This will require further work to get it booting directly from Grub to Windows 7 but, for now, it will suffice to select Vista and then Windows 7.

On to the testing.

Update:

It just dawned on me that the Windows 7 installation is on /dev/sda7, which is an extended partition. Since Windows can only boot from a primary partition, the boot files etc. will have to remain on the Vista partition, /dev/sda3. This means that I will not be able to make Windows 7 boot directly from the grub menu. Instead I will have to continue booting to the Vista partition which contains the Windows boot loader and then choose Windows 7 from there.

It’s really too bad that Microsoft hasn’t been able to figure out how to have independently bootable partitions like Linux and *BSD but, I will forgive them that. I still resent their overwriting of pre-existing boot loaders without so much as a prompt. At the very least, it’s really rude.

DVD Transcoding With HandBrake

In an earlier post, the Net Codger wanted to transcode a DVD for playback on a portable device. In this case the device in question was an iPod Touch. Having been unsuccessful at the task while using openSUSE 11.1, success was later found on another computer that was running Ubuntu 8.04. But, success was not immediate. Here’s what happened.

Initially, I tried using Mencoder for the transcoding. Mencoder is part of the Mplayer project and is one of the most versatile transcoding tools available for the Linux or any platform. Mencoder is the Swiss Army knife of video transcoding tools capable for transcoding almost any format into almost any other format. Like a Swiss Army knife it is also so chock full of features and tools that it is cumbersome and unwieldy to use. But, not only is Mencoder a really powerful tool it is also one of the few tools available for such a job, on Linux, that actually works. Which is why it was my first choice.

Like I said Mencoder is rather cumbersome to use. Typically, it requires a vast array of command line switches specifying frame rates and sizes, bit rates, sample rates, sound encoders and more to achieve the desired output. I’ve used Mencoder in the past for similar tasks including transcoding DVDs for playback on Sony’s PSP. e.g. This “simple” command for PSP transcoding.

mencoder dvd://1 -dvd-device /dev/sr0

-aspect 16:9

-alang en -oac lavc

-ovc lavc

-of lavf

-lavcopts aglobal=1:vglobal=1:vcodec=mpeg4:vbitrate=384:acodec=aac:abitrate=64

-af lavcresample=24000 -vf harddup,scale=368:208

-lavfopts format=psp:i_certify_that_my_video_stream_does_not_use_b_frames

-ofps 30000/1001 -o M4V10005.MP4

-info name=”I Robot”

Simple, huh? But, not being an expert at video encoding or Mencoder I searched for a script or command line recipe for the iPod Touch transcoding job at hand. I finally settled upon this script at the My Humble Corner blog. The script was straightforward enough for me to read and understand while also promising the specific results required for the iPod Touch’s very specific playback requirements. These playback requirements include a special bunch of bits, called an atom, that are set in the .mp4 video file to indicate that the file came from iTunes/Quicktime and nowhere else. This is part of Apple’s continued attempts to lock in and impose DRM(Digitally Restricted Media) upon its customers. ‘You will use only Apple products! So says Steve, so say we all. Amen.’

Unlike my earlier openSUSE failures, this installation of Ubuntu 8.04 had no trouble playing and decoding DVDs but, it didn’t have Mencoder or the MP4Box application that the script required. A couple of quick and easy sudo apt-get install mencoder commands had me running the script in no time at all. While, the DVD was being transcoded and while I waited for the nearly four hours for it to complete I started contemplating the whole process. It was all too complicated and took too much time and effort. I remembered, with envy, all the accounts I had heard of Apple Mac users quickly and easily using a graphical tool called Handbrake to do all this. But, when last I had checked, Handbrake was Mac OS X only.

I started surfing around for a Linux equivalent, or at least a GUI front-end to Mencoder. What I found were a few stagnant open source projects that didn’t really offer too much hope. True they were GUI but, they weren’t very attractive, to say the least. Most were just as complicated to use as Mencoder itself, requiring detailed knowledge of video encoding and Mencoder. Then, by accident, I stumbled on a page that seemed to imply that HandBrake was now supporting Linux. I jumped over to the HandBrake site and was amazed to find that HandBrake now supported Linux and Windows, as well as the Mac.

Installing HandBrake on Ubuntu was easy since, they had an Ubuntu binary but, the source is also there for compilation if you need it. HandBrake also did not have as many dependencies as the other Mencoder solutions. Which was a pleasant surprise.

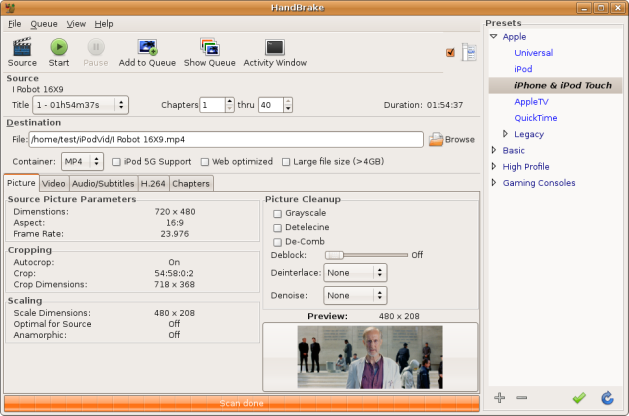
Running HandBrake, one is immediately aware of the fact that it has a superior quality GUI compared to the other contenders. It is attractive and highly functional while also being straightforward and intuitive enough for a transcoding novice to use.

HandBrake

After choosing the source DVD, the user is presented with this screen that lists various formatting details as well as a very handy list of formatting presets for a variety of devices including the iPod Touch. This list of presets alone sets HandBrake way ahead of the competition. HandBrake also displays a sample frame from the DVD to show you what the output video will look like. Very nice!

HandBrake Video

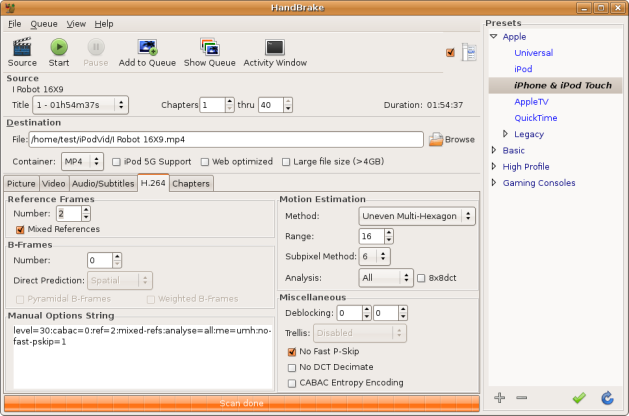
Choosing any of the tabs allows you to change various settings such as video, above, and H.264, below.

HandBrake H.264

But, HandBrake’s great features don’t end there. On top of everything else, HandBrake is also a fast transcoder. Where as the Mencoder script took nearly four hours to transcode the DVD, HandBrake transcoded the same DVD in under one hour!

It seems that the Mac users were right about HandBrake. HandBrake is, by far, the easiest to use, most attractive and fastest video transcoding solution I’ve used to date.

HandBrake is now Net Codger approved. Let’s hope that all the Linux distributions start including it in their repositories.

openSUSE 11.1 – Update

I’ve been playing around with the openSUSE 11.1 installation on my Dell Precision M6300 laptop, discussed previously. I’d been having issues with this installation and I was trying to figure out what the issues were precisely.

The first issue was with wireless connectivity. I was unable to establish 802.11n connections to my 802.11a access point(AP). That problem remains. I’m also still having problems connecting to the 802.11a AP, though once it connects everything if fine at up to 54Mbps. However, I tried connecting to the same AP using the 802.11g SSID and it seems to consistently and reliable connect. It even claims to be running at 60Mbps which would suggest that 802.11n connections might be working. Although, I get MUCH faster 802.11n connections using other operating systems on the same laptop connecting to the same AP so, I’m not sure that it’s really working. I haven’t fully tested this yet as I was happy enough with a reliable 802.11g connection to move on to bigger problems.

Another issue that I was having was no sound during DVD playback under KDE 4.1. It turned out that the sound output for that type of audio device was disabled. The result was that things like startup sounds worked, leading me to think that sound was properly setup, but DVD sound didn’t work. Not that I disabled it, that’s just how it was after the installation. I enabled it and suddenly had DVD sound, just like KDE 3.5.

Just as in KDE 3.5 I still don’t have DVD playback working. Crawling around on the web, I found that there is a permissions issue with openSUSE 11.1 and DVD access. The fix is to add yourself and/or your users to the Disk group, in order to gain the appropriate permissions. Doing this eliminated permission errors in Kaffeine and the “no stream can be found” errors in MPlayer. Although, the DVD now mounts without errors, it still plays back like a Max Headroom flashback, stuttering and restarting.

During this troubleshooting session, I again stumbled onto Bill Beebe’s blog. It seems that he has returned to openSUSE again, after a Mandriva deviation, and is having greater success than I have benn. It was there that I also learned about the new and improved One-Click-Install for restricted media formats like DVDs. It certainly seems a lot easier than the whole Packman method I tried and failed with earlier so, I gave it a try.

The One-Click-Install did pretty much the same things I’ve described in previous posts. Basically, it added some repositories to Yast and installed the Packman versions of the video players. It also reintroduced the permissions problem that I described earlier, which I found odd. Anyway, the fix was quick and easy now that I know what it is and how to fix it.

What the One-Click-Install did not do was resolve my issue with Kaffeine’s inability to play DVD’s without jerking and stuttering back and forth. It did for unknown reasons fix MPlayer’s problem as it now plays DVDs as it should. But, it also introduced two new, or hitherto undiscovered, problems.

First, the MPlayer video size would not change. I could select double size or even full screen from the menu but, while the window and its black background would snap to full screen, the actual video remained unchanged. This annoying an unexpected behavior is apparently the default with the MPlayer GUI. Apparently they feel that people don’t typically want to resize the video window. Go figure. Much searching lead me to discover that putting the zoom option in the config file resolved the problem.

~/.mplayer/config

zoom = “1”

But, the trouble didn’t end there. Once I was able to re-size the video, I quickly discovered that sizes ranging from approximately 3/4 screen to full screen resulted in glitchy stilted video playback and the sound would soon become grossly out of sync. But, why isn’t this thing able to play properly at full screen? I suspect that it is due to insufficient video card horse power (which is a whole other blog post) but, given the specs of this machine I would have to attribute the fault to MPlayer.

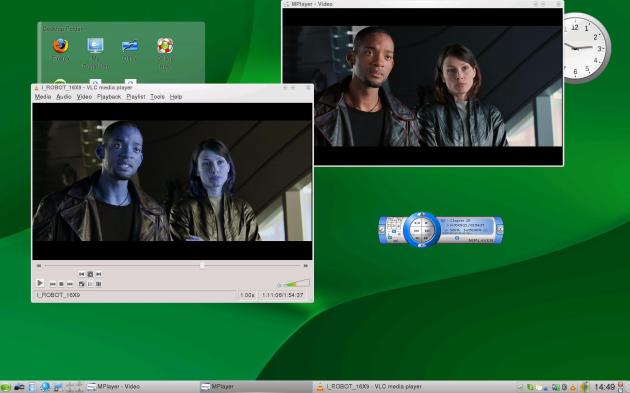
Well, Bill Beebe had success with VLC so, I followed his lead and installed it as well. It too played the DVD but, it too had its problems. The most noticeable problem was the colors in the video were off or reversed almost like a negative effect. VLC, like MPlayer, also started the stilted playback issue when the video was sized close to full screen.

Colorful VLC

Frankly, I’m blown away by all of these problems. I haven’t had these issues in the past with other OSes, even older versions of openSUSE have not given me this much trouble playing a DVD. It may well be time to scrap this upgraded install and try a from scratch install. It can’t really be this bad, can it?

KDE 4.1 On openSUSE

While I’m playing with openSUSE 11.1 I should also talk about KDE 4.1. This is the new improved version of the widely panned KDE 4.

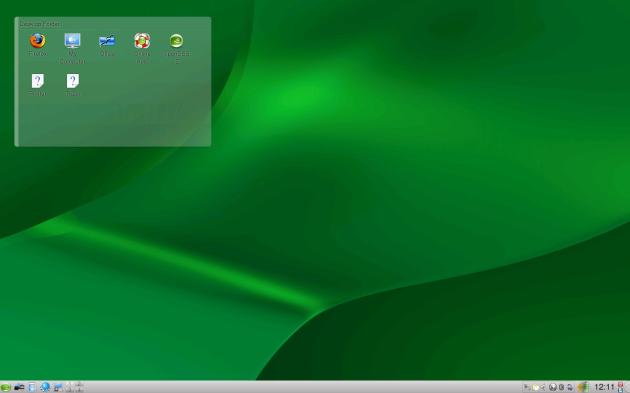
The initial desktop is clean, having only a single widget that contains desktop shortcuts. It seems that this widget may only have appeared because there was a KDE 3.5 desktop already. The Printer and Trash icons look out of place compared to the rest and what you would normally expect on a desktop. I suspect that, with a completely new user and no previous desktop, there would be nothing on the initial desktop.

entire-desktop
I have to admit, it looks very nice and it feels slightly OS X or Vista-ish with the widgets on the desktop. But, there are some major issues as well. As mentioned in previous posts, the login to the KDE 4.1 desktop is four or five times slower than with KDE 3.5 taking a full 20+ seconds before presenting an operational desktop. Once it’s up it isn’t too bad but it is definitely sluggish. Clicking on the Application Launcher, formerly K menu (KDE’s version of the start menu), it takes a full second for the menu to come up. Launching and closing applications also has a brief but noticeable “paint” time on the screen.

KDe 4.1 Desktop Widget
Mousing over a widget, a tab flies out of the side of the widget. The tab contains controls for the widget and although the function of some of them area fairly obvious, others are fairly mysterious. Starting at the bottom, the red X closes the widget. Next up the wrench icon represents widget settings and the circling arrow is the refresh that most people have learned to expect. But, the top one was a mystery to me. clicking on it provided feedback that it had been clicked but, nothing seemed to happen. widget-sizerI played with it curiously for some time before stumbling upon what it did. If you click and hold it down, it allows you to drag that corner of the widget and resize and change the aspect ration of the widget. Rather like grabbing the lower right corner of a window in most other operating systems and desktop environments. I expected this button to somehow allow me to reposition the widget on the desktop but, it didn’t. Further playing around lead me to discover that there is a small invisible band all the way around the widget that when grabbed, allows you to reposition the widget. Additionally, grabbing an empty area of the widget control tab does the same thing. None of this was obvious, nor id it feel intuitive. Some tool tips or some other indicator would be a great idea in this area.

KDE 4.1 Excess TabsThrough the course of later use and desktop customization I found that when you have many widgets on the desktop, running your mouse across the screen and over the widgets causes the widget control tabs of all the widgets to fly out and eventually back in. But, for a couple of seconds all of the control tabs are displayed on the screen. this creates a few undesirable side effects. First, the screen looks very cluttered and since that was not the user’s intent, it creates a sense of loss of control as the screen displays lots of activity that wasn’t intended or desired. Even after I had become accustomed to it, I still find it annoying.
The picture also shows another unexpected behavior. Except for the previously mentioned tabs, it looks like most other desktops with icons on the desktop. But what look like normal icons are actually widgets that behave like a hybrid of a widget and an icon. The ones in the picture were created as standard desktop files and shortcuts in a KDE 3.5 desktop and then interpreted as widgets by KDE 4.1. I could not find a way to create a new one directly on the desktop and that lead to another unexpected change in behavior.

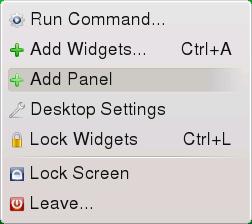
Right clicking the desktop, one might expect a menu that allows them to create new folders, links and other desktop items. Instead the menu offers widget and panel controls, as well as the Lock and Leave(logout) options.

KDE 4.1 Desktop Properties

I could not create a new file, folder or shortcut on the desktop. Right clicking the desktop brings up a menu that allows you to add a widget or panel and to run a command or leave the session. Later, I would find that dragging a file or icon from a folder to the desktop would create this odd icon/widget hybrid but, I felt that this was a ridiculous increase in complexity to create a shortcut on a desktop.

KDE 4.1 File Folder Properties

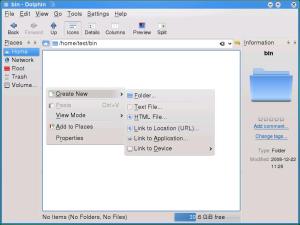
The good news is that the expected new item menu still appears when you right click within a folder or a folder widget rather than the desktop itself.

While I understand the desire to create a new and perhaps improved desktop environment, certain behaviors and expectations, good or bad, have been created by most desktop environments over the past 12 to 15 years. A radical departure from the norm, such as KDE 4.1 exhibits can be very frustrating and cumbersome. I may get use to the new paradigm but, I’m rather hoping that KDE will adjust their strategy a bit. The new way adds several steps to very basic desktop functions and that greatly hampers productivity. Combined with the significantly slower overall performance, it is no wonder that there has been so much acrimony over KDE 4.

OpenSUSE 11.1 – Use Case Scenario

I’ve got a DVD that I need to transcode and the Dell Precision M6300 laptop, discussed in previous posts, is the only machine that I can spare for this rather lengthy and processor intensive task at the moment. It’s a perfect task to test openSUSE 11.1 with.

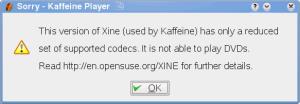
I slip the DVD into the drive and wonder if it will even play on openSUSE 11.1. I click on Kaffeine, the KDE video frontend to Xine, and tell it to play the DVD. Not surprisingly, it pops up a message that Kaffiene/Xine plugins are restricted due to licensing and encryption laws but, it provides a URL to a page on the openSUSE website that describes the restrictions and then points to ways around the problem.

Kaffeine Codecs

None of this is new for Linux DVD playback. For those using openSUSE, the preferred option is to add the Packman third-party repository to your Yast configuration and then install or update the various players and codecs with unrestricted versions. The procedure is described in many places but having it in one more can’t hurt.

I right clicked on the green chameleon head in my system tray and chose “Add/Remove Update Sources” which then opened up the appropriate page in Yast. Clicking the add button and then selecting “Specify URL” I am presented with blank fields for information about the repository. Next I enter an arbitrary name for the repository and finally the magic URL http://packman.unixheads.com/suse.11.1. Additionally, I enable the OSS and non-OSS repositories already present in Yast.

With the repository entered, I open up Yast and choose “Software management”. Here I perform a search for Xine1 and install it and its dependencies including the Packman version of Kaffeine. While here I also take the opportunity to install Mplayer which I know I will need to perform the transcoding. Mplayer has a dependency on libdvdnavmini that Yast is unable to satisfy and I proceed to crawl around the web looking for it.

As it turns out, libdvdnavmini is part of the libdvdnav4 package that is sitting right there in the OSS repository. Why can’t Yast see it? This is the sort of rubbish that really annoys me. This is just sloppiness on the part of the packager and it really shouldn’t be slipping past the QA folks with something as popular as an Mplayer dependency.

Once I had libdvdnav4 installed, Mplayer installed without any problems and I tried playing my DVD again using Kaffeine. It works! Uh, wait a minute it’s playing at a very high speed and stuttering back and forth like Max Headroom but, there is no audio. This is becoming tedious!

If it plays back at all, then that suggests that the right software is in place. The stuttering video suggests to me that a performance issue or perhaps a video driver issue might be the cause.

Up to this point, I’ve been using the KDE 4.1 interface and I’ve noticed a significant performance hit when compared to KDE 3.5. Login alone takes a full 20 seconds under KDE 4.1 versus five seconds for KDE 3.5. I logout and log back in under KDE 3.5 and fire up Kaffeine again. I get the same stuttering video but, I also get audio now and oddly, the audio is not stuttering. Trying Mplayer, I get audio but the Mplayer video window crashes. I turn back to the web. But, my wireless is again refusing to connect to my access point. Perhaps a reboot will help.

Rebooted and logged back in under KDE 3.5 I again try to connect my wireless. Again, it fails. I’m starting to think that this whole thing is a waste of time. I try Kaffeine again to see if it wants to work and the DVD won’t even mount! I reboot, yet again, and log in under KDE 4.1. Finally, the wireless connects but, the DVD still won’t work. The system mounts it but, Kaffeine says the source can’t be read and Mplayer says that no stream can be found to read DVD://1.

Rethinking the matter, I find myself again in the Yast software management application. Poking around in the DVD libraries, I see that there are a few libraries that have not been updated, despite the previous installations and updates, specifically libdvdread3 and 4. I manually select them for update and after that is done, I retry Kaffeine. Still no joy.

I’ve spent so much time on this that another machine capable of playing and transcoding DVDs has become available and I’ve decided to give up on this one. I still can’t believe how much trouble I’ve had still resulting in failure. I’m now thinking that the upgrade of openSUSE must be the issue and I’m contemplating a from scratch install to test 11.1. Regardless, the upgrade of my 10.2 machine to 11.1 is out of the question for the time being.

openSUSE 11.1 Testing

I have a laptop that’s about a year old. Actually, considering the size and heat that it generates, the laptop would be better referred to as a desktop replacement. It was a big honking machine at the time of purchase and its specifications are still very respectable.

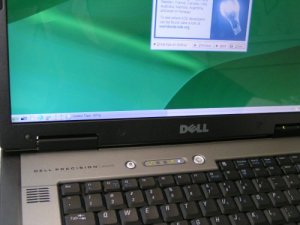
Laptop

It’s a Dell Precision M6300 with the following specifications:

Intel Core 2 Duo T7500 @ 2.20Ghz

2GB RAM

160GB 7200RPM Fujitsu SATA Hard Drive

DVD +/- RW Optical Drive

Intel PRO/Wireless 4965 AGN WiFi

Dell Bluetooth Device

Nvidia Quadro FX 1600M w/ 256MB RAM

17” 1920X1200 WUXGA LCD Screen

And lots more.

Though it came with Vista Ultimate, for various reasons, it presently also runs three additional operating systems. One of the operating systems that it has installed on it is the 64 bit version of openSUSE 11.0. It is a perfect test platform to test the newly released openSUSE 11.1 on and see if openSUSE 11.1 is a viable candidate for upgrading my old openSUSE 10.2 machine.

I hopped onto the openSUSE website to download the DVD ISO. I chose the BitTorrent download because it’s faster. Right? Well, BitTorrent was uploading at 30KBps and downloading at 2KBps and after 5 minutes of that I was yet again wondering why anyone bothers with BitTorrent. (But, that’s another blog post.) Switching to the HTTP/FTP download option I was presented with 940KBps download speed. Almost an hour later, I burned the ISO to DVD and slammed it into the laptop.

Booting from the DVD was uneventful and I chose the “Update” install option. (Shouldn’t this be called Upgrade?) After a scan of my disks, I was presented with a dialog box that complained about the 11.0 installation using kernel-device names and strongly recommending that I boot into the older version and change its naming convention.

What? Kernel-device names? What is that? How does one change it? I aborted the installation and booted into the older 11.0 install. While I waited for it to boot, I started researching the subject online. I’ve been using Linux for the better part of 10 years and I’d never encountered this message before.

After copious amounts of rather cryptic documentation I discover that openSUSE 11.1 prefers not to use the /dev/sda7 naming convention, that has been used for ages, by default. Instead opting for the newer /dev/disk/by-id/ata-FUJITSU_MHW2160BJ_G2_K30VT7B27360-part7 for fear that the partitions might get renumbered. And who would argue against that? It’s so much simpler and straightforward, isn’t it?

OK, I don’t follow the reasoning. The new system still relies on a partition number so, I can’t see that anything has been gained. What’s more, that particular partition has another OS installed on it that I couldn’t care less about so if it gets destroyed, I won’t be shedding any tears. I decide that it’s not worth the trouble of changing the old system and reboot from the DVD to forge on ahead with the upgrade. But, I’ve just wasted an hour trying to figure this out. That’s a bad start to an upgrade. How would a new user react?

Except for the previous warning, the upgrade completes without a hitch in about 30 minutes and the laptop reboots into a HUGE fuzzy login screen. I groan as it’s immediately apparent that the video resolution is way off.

It seems like Xorg is broken and I’m depressed at the prospect of yet another manual xorg.conf configuration session and it’s accompanying fight with drivers and 3D acceleration. Especially since the video was working perfectly before and I didn’t remember having to futz with Xorg when I initially installed openSUSE11.0.

I logged in and went straight to Yast to see if I can rescue the video. To my pleasant surprise, the correct Nvidia driver is already installed and it is simply a matter of the incorrect resolution being set. I choose 1920X1200 WUXGA from the drop down list, logout and back in and the video is great! Just as it should be. I’m very relieved and happy again. But, would the new user be able to get through as easily and why did it not detect the right resolution from the beginning? This was an upgrade, it could have left the xorg.conf file alone and everything would have been fine. Moving on.

What’s the next step? Well for some people it’s changing the desktop theme color to something painful but for me, the next step is to get online and download the latest patches and updates. Clicking KNetworkManager (Did I mention that I prefer KDE?) I see that the wireless configuration settings for my access point are still intact. I click connect and wait.

In the older 11.0 version, I was never able to get an 802.11n connection and I was hoping that it would be a bonus of the newer software. Instead, I again met with disappointment. Not only did I not get 802.11n, I couldn’t get the 802.11a connection that I had been using with the older software. Nuts! I start fiddling with settings and I erase and recreate the profile, in case it got corrupted by the upgrade. Nothing gets me connected until I reboot. After a reboot, I create a new connection profile and it connects. Great! But, after another reboot it is again unable to connect. Connecting this installation to my 802.11a access point is a hit or miss proposition with no clear indication of what is wrong. Sometimes it works and sometimes it doesn’t. Very annoying. Not having 802.11n is also annoying. None the less, I run the update program and install three or four patches.

I haven’t mentioned it yet because of the more pressing issues but, the kernel-device names business discussed earlier did have an impact. The OS that is installed on /dev/sda7 is no longer on my grub menu making it unbootable. But, the partition is still intact and I am sure that I can manually recreate the necessary grub entry to boot it if I really want to. I may do that but, I’m just as likely to delete the partition and install something else.

I’ve spent a fair bit of time installing the openSUSE 11.1 upgrade on this laptop and the results have not been perfect. With such an ominous beginning, one might be tempted to abandon this distribution. But, except for the flaky wireless, the issues have been resolved and it seems to work. Additionally, this is simply a test to see if openSUSE 11.1 will work for me on my other machine. That computer is a desktop system that doesn’t have multiple operating systems on it and it doesn’t have any wireless either so, the problems I have encountered so far should not impact that machine.

It’s time to test some applications.

My History With openSUSE

Way back when, I used Red Hat Linux as my main distribution. I started using Red Hat at version 6 and stuck with it for a few years. Later, Red Hat did the switch to Fedora and caused a fair bit of disharmony amongst their community. This, along with with some other issues that I had with Fedora, caused me to feel the need to change distributions.

opensuseDue to my familiarity with Red Hat, I chose to stick with an RPM based distribution. There were many to choose from at the time but, the biggest contenders were Mandrake and SuSE. After playing around with the various choices I settled on SuSE. At the time I felt that it was head and shoulders above the rest. It was a beautiful distribution and it worked extremely well out of the box compared to its competitors.

I was very happy with my choice and when SuSE 9.1 came out I was even more thrilled. It was, beyond doubt, the best distribution available at the time. I was happy and SuSE Linux was making great strides. So much so that networking giant, Novell, bought SuSE out. Naturally there was some trepidation but, by and large this was viewed as a positive thing. With Novell’s might behind SuSE’s momentum, it was sure to dominate the Linux market.

As time went by Novell did a similar thing to Red Hat where they created two different distributions from the one. They had the fee based Novell Linux Desktop(NLD) and the free community driven openSUSE. This was around version 10 if memory serves me correctly and by the time openSUSE 10.3 arrived, it was apparent that there were growing quality issues with openSUSE. So much so that one of my personal machines, that really demanded stability and reliability, remains at 10.2 to this day.

Unfortunately for that machine the openSUSE project has, true to its two year support policy, now discontinued support for the 10.2 version. That means no more patches or security fixes. It is a problem that forces me to upgrade the machine in question. Not coincidentally, openSUSE released its latest version 11.1 at the same time that they discontinued 10.2. And, though previous versions were problematic enough to prevent me from upgrading, there were great things being said about this latest version. I even saw where someone said that SuSE was back.

Now, lest you think I focus only on old versions of SuSE, I should point out that I have way too many other personal machines upon which I use different versions of openSUSE and different distributions all together. Combined with the machines that I use for work and customers machines I’m exposed to a very broad array of all the major distributions. In the past month alone I have used Red Hat, Fedora, Centos, openSUSE, Ubuntu, Mandriva, Xandros and Debian extensively. And, those are just the Linux distros. I’ve also used FreeBSD and OpenSolaris and of course all flavors of Windows from 95 to 2008. (Yes, I found someone that still had an operational Windows 95 machine but, that’s a whole other blog post.) The point is that I am exposed to a broad cross section of distributions.

Despite all this, since my favorite old machine is openSUSE 10.2 it seemed only logical to remain with openSUSE for its upgrade. But, before I screw up the machine dearest to me, I’d better test openSUSE 11.1 thoroughly so I know what to expect. I’ve got a machine with an underwhelming installation of openSUSE 11.0 that’s just itching to get trashed so, let’s see what happens…